

一键脚本
socks5-for-serv00
这篇教程详细介绍了如何在 Serv00 和 CT8 机器上一步到位地安装和配置 SOCKS5 代理,并将其用于 cmliu/edgetunnel 项目,帮助解锁 ChatGPT 等服务。通过一键脚本实现代理安装,使用 Crontab 保持进程活跃,并借助 GitHub Actions 实现帐号续期与自动化管理,确保长期稳定运行。
- 使用Crontab进行进程保活,每12分钟执行一次
- 使用Github Actions进行帐号续期&Crontab保活,每天 早8:30 / 晚9:30 执行一次
事前准备
- 一个电子邮箱
注册帐号
CT8 注册线路 波兰 注册问题答案:
MyDevil如何使用?
- 申请端口
- 开启管理执行权限
- 执行一键脚本
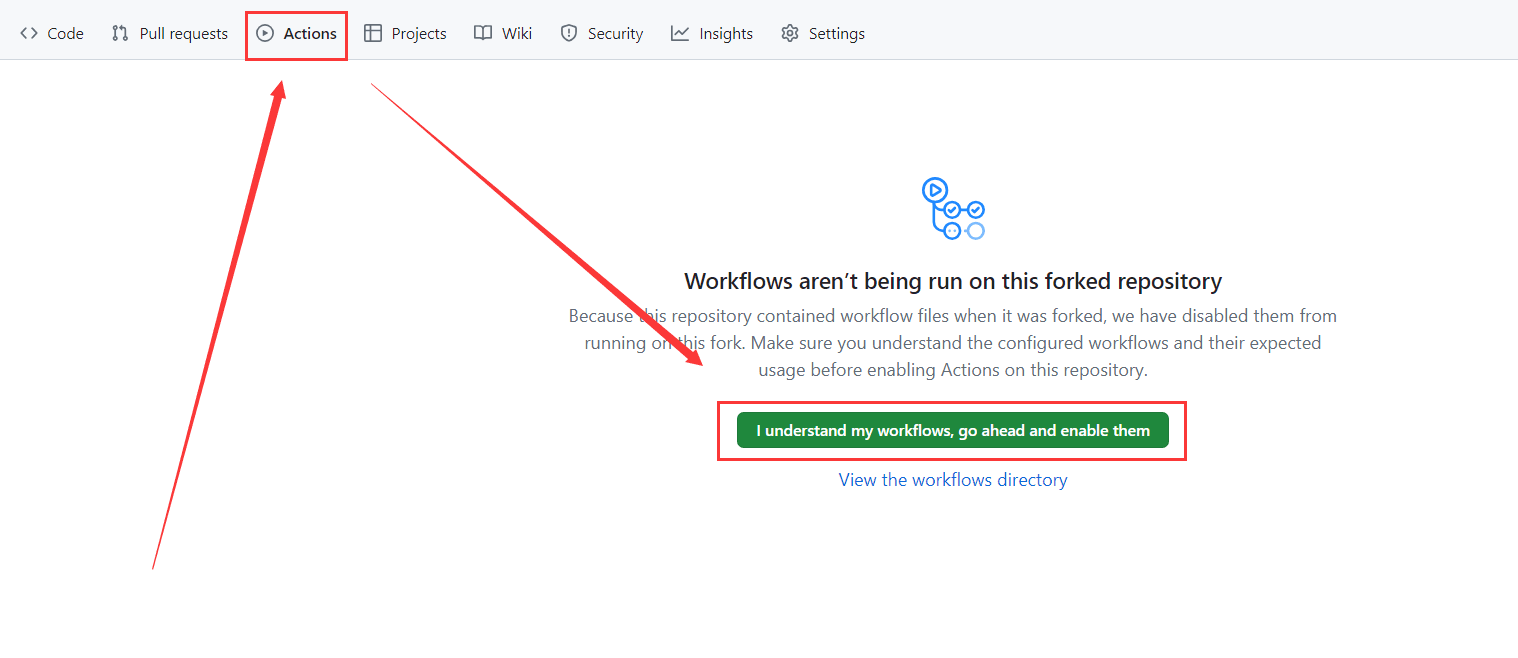
- Fork cmliu/socks5-for-serv00项目 开启Actions保活续期
步骤1.申请端口
- 登录你帐号对应的 panel 面板
- 面板左侧 >
Port reservation> 选择Add port标签栏 > 勾选Random>+Add
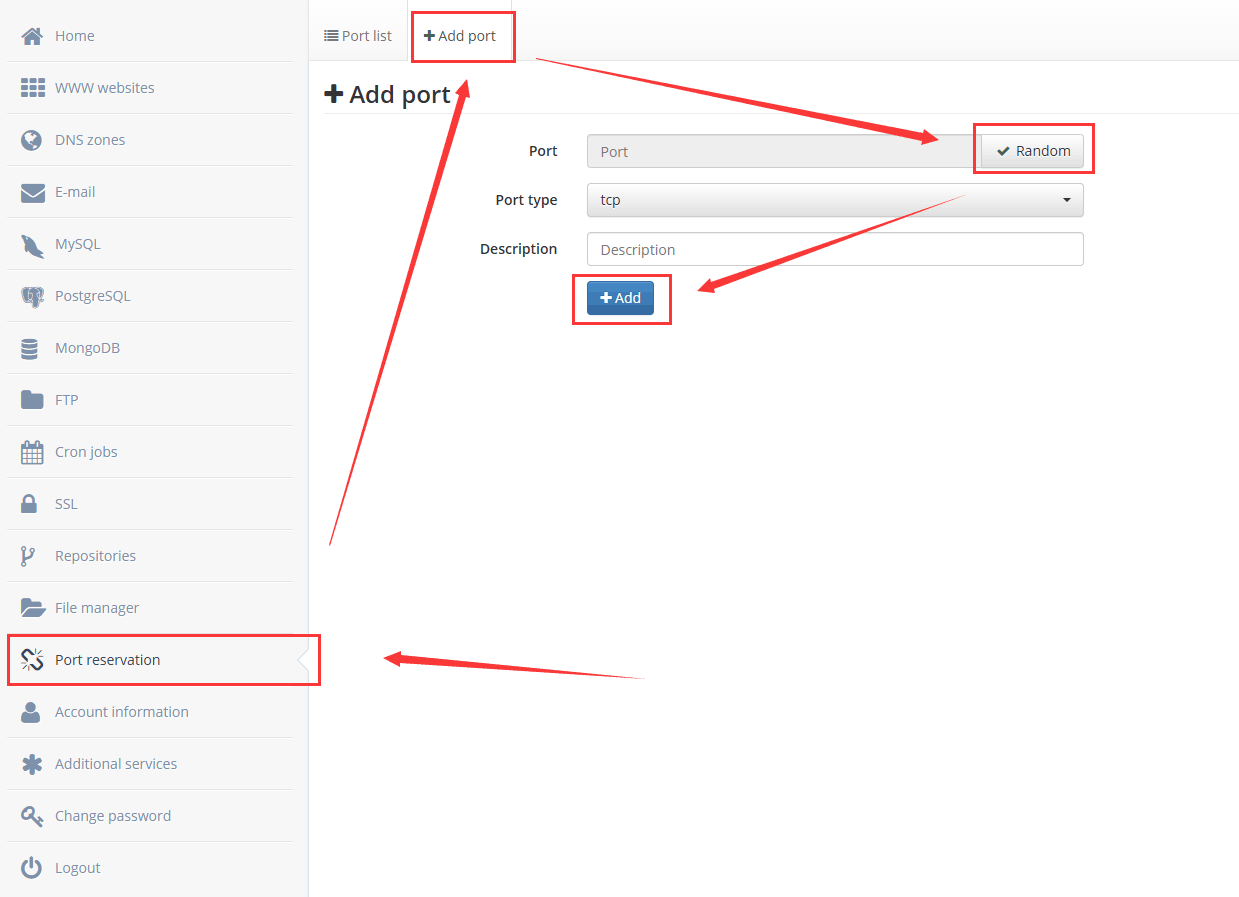
- 选择
Port list标签栏 > 记录你分配到的TCP端口号

步骤2.开启管理执行权限
- 登录你帐号对应的 panel 面板
- 面板左侧 > 选择
Run your own applications标签栏 >Enabled; 使其Status变成✅Enabled即可

步骤3.执行一键脚本
- 注意:在输入socks5端口号时,输入申请端口时记录的TCP端口号即可,其余参数可以自行输入任意内容;

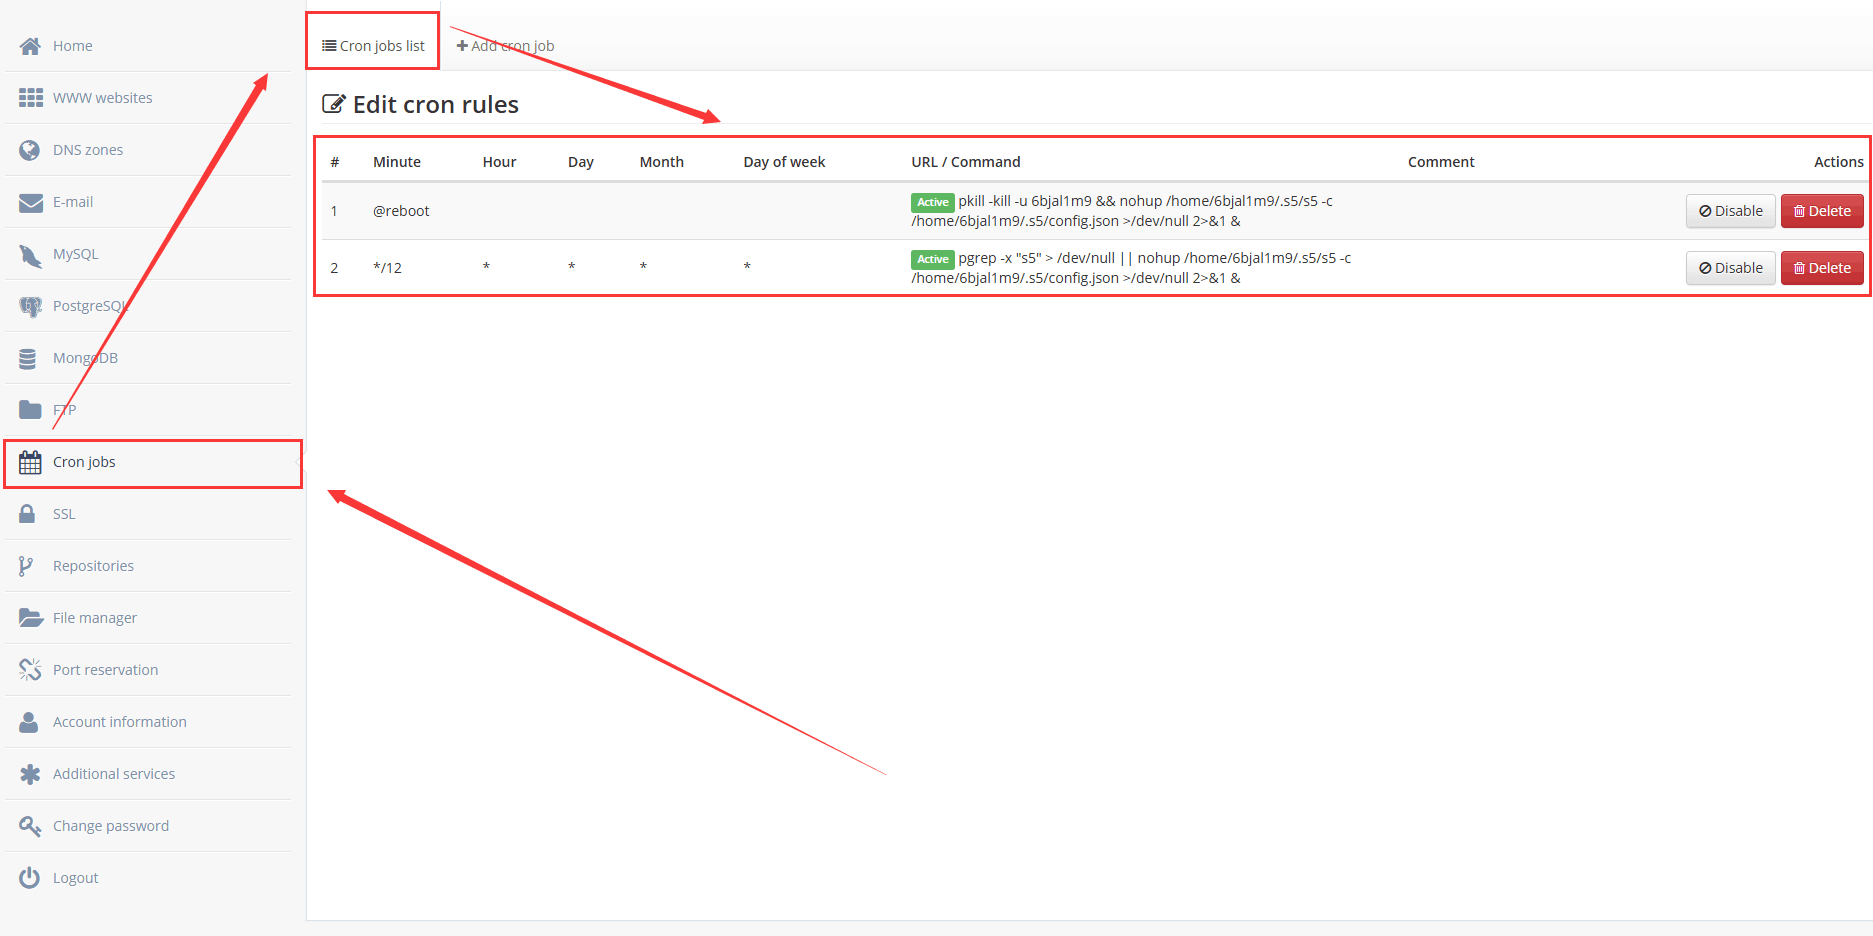
- 配置完成脚本后推荐添加 crontab 守护进程的计划任务,输入
y后回车即可;
- 查看crontab任务是否添加成功
步骤4.开启Github Actions保活
- 添加 Secrets.
ACCOUNTS_JSON变量
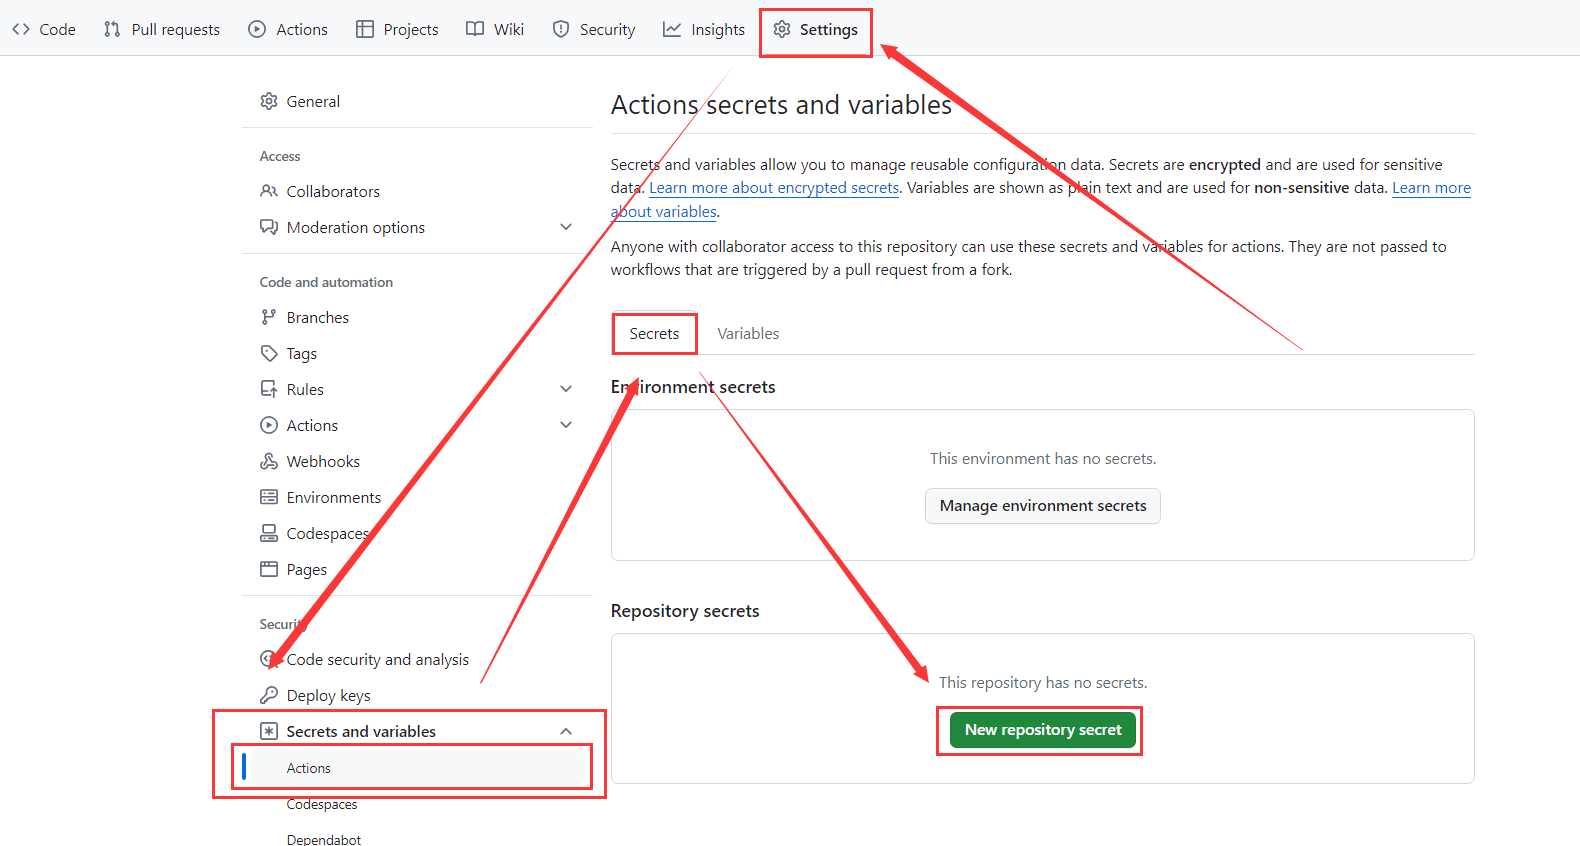
- 帐号格式如下:
json
12345 | [ {"username": "cmliusss", "password": "7HEt(xeRxttdvgB^nCU6", "panel": "panel4.serv00.com", "ssh": "s4.serv00.com"}, {"username": "cmliussss2018", "password": "4))@cRP%HtN8AryHlh^#", "panel": "panel7.serv00.com", "ssh": "s7.serv00.com"}, {"username": "4r885wvl", "password": "%Mg^dDMo6yIY$dZmxWNy", "panel": "panel.ct8.pl", "ssh": "s1.ct8.pl"}] |
- 开启Actions保活
更多进阶玩法
添加了hysteria2的天诚大佬版本:https://github.com/gshtwy/socks5-hysteria2-for-Serv00-CT8
一键脚本
bash
1 | bash <(curl -s https://raw.githubusercontent.com/gshtwy/socks5-for-serv00/main/install-socks5-hysteria.sh) |
多协议多合一的老王版本:https://github.com/eooce/Sing-box
Serv00|CT8一键四协议无交互安装脚本vmess-ws|vmess-ws-tls(argo)|hy2|tuic5
- 必填环境变量:
VMESS_PORTHY2_PORTTUIC_PORT
- 可选环境变量:
UUIDNEZHA_SERVERNEZHA_PORTNEZHA_KEYARGO_DOMAINARGO_AUTHCFIPCFPORT
- ARGO_AUTH变量使用json时,ARGO_AUTH=‘json’ 需用英文输入状态下的单引号包裹,例如:
ARGO_AUTH='{"AccountTag":"123","TunnelSecret":"123","TunnelID":"123"}'
bash
1 | VMESS_PORT=tcp端口 HY2_PORT=udp端口 TUIC_PORT=udp端口 bash <(curl -Ls https://raw.githubusercontent.com/eooce/sing-box/main/sb_00.sh) |
Serv00|CT8一键三协议无交互安装脚本vless-reality|vmess-splithttp|vmess-splithttp-tls(argo)
- 必填环境变量:
VLESS_PORTARGO_PORT
- 可选环境变量:
UUIDCFIPCFPORTNEZHA_SERVERNEZHA_PORTNEZHA_KEYARGO_DOMAINARGO_AUTH
- ARGO_AUTH变量使用json时,ARGO_AUTH=‘json’ 需英文输入状态下的单引号包裹,例如:
ARGO_AUTH='{"AccountTag":"123","TunnelSecret":"123","TunnelID":"123"}'
bash
1 | VLESS_PORT=TCP端口 ARGO_PORT=TCP端口 bash <(curl -Ls https://raw.githubusercontent.com/eooce/sing-box/test/x00.sh) |
Serv00|CT8 hysteria2无交互一键安装脚本
- 必填变量:
PORT=UDP端口
- 可选变量:
UUIDNEZHA_SERVERNEZHA_PORTNEZHA_KEY
bash
1 | PORT=UDP端口 bash <(curl -Ls https://github.com/eooce/Sing-box/releases/download/00/2.sh) |
Serv00|CT8 tuic无交互一键安装脚本
- 必填变量:
PORT=UDP端口
- 可选变量:
UUIDNEZHA_SERVERNEZHA_PORTNEZHA_KEY
bash
1 | PORT=UDP端口 bash <(curl -Ls https://github.com/eooce/Sing-box/releases/download/00/tu.sh) |
Serv00|CT8 vmess-ws-tls(argo)一键脚本
- 必填变量:
PORT=TCP端口
- 可选变量:
UUIDNEZHA_SERVERNEZHA_PORTNEZHA_KEYCFIPCFPORTARGO_DOMAINARGO_AUTH
bash
1 | PORT=TCP端口 bash <(curl -Ls https://raw.githubusercontent.com/eooce/scripts/master/containers-shell/00_vmess.sh) |
欢迎您在底部评论区留言,一起交流~
- 作者:WangWenzhi
- 链接:https://www.wwz.im/article/Serv00JB
- 声明:本文采用 CC BY-NC-SA 4.0 许可协议,转载请注明出处。


